


Making a Haiku USB Stick
Using a USB flash drive is one of the best ways to install Haiku. It is also the only way to really try and enjoy all the features of Haiku without touching your hard drives. The Haiku live CD is limited by the slow access time of CDs and still lacks a few features due to the added complexity to run on a read-only media. Note that running off a USB flash drive might still be a lot slower than a real hard drive depending on your model.
In the following guide, we will copy the "Anyboot" disk image directly to the raw drive, not to a partition, replacing everything including the MBR, destroying all the partitions and data that were there. Although the size of the Haiku bootable partition is fixed, the "Anyboot" image contains a partition table and will allow to create one or more partitions in the remaining space (with any partitioning tool and file system).
Once this is done, you'll be able to either use Haiku directly or make a real install onto a harddisk by running Installer (found in Deskbar's Applications menu).
First, be sure you have a computer that supports booting off of USB flash drives. That shouldn't be a problem on most recent computers. You might need to hit a function key (e.g. F8) at boot or change the boot device order in your BIOS for the USB stick to be picked up, please refer to your computer or mother-board manual.
Pretty much any tool that can be used to write an ISO image onto a USB flash drive can be used to create a Haiku USB stick.
As example, we use the application Etcher which is available for Linux, MacOS and Windows. If you're already running Haiku and would like to create a USB flash drive of it, see the "Haiku: Using Installer and DriveSetup" section further down.
Linux, MacOS and Windows: Using Etcher
Start by downloading the "Anyboot" disk archive from the Haiku website and unpack it. Get a sufficiently big USB flash drive (at least the size of the unpacked Anyboot image).
Best unmount and remove all USB flash drives that may be plugged into your computer to avoid picking the wrong one.
Download the version of Etcher that matches your operating system, install it and launch it.
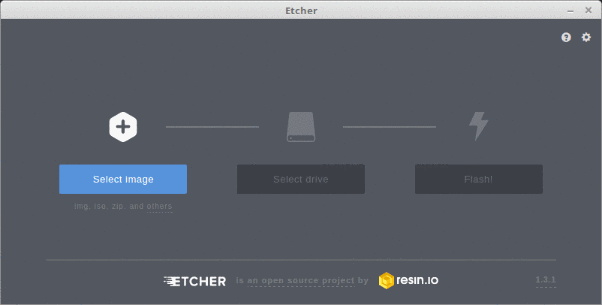
Click to the left and choose the Haiku Anyboot ISO that you have downloaded and unpacked before.
Plug in your USB flash drive. It should automatically appear as the icon in the middle of Etcher's window.
Check if the destination really is your plugged in USB flash drive by clicking on under the drive icon in the middle.
Click and wait until the ISO was written, validated and the USB flash drive unmounted.
Any tool writing ISO images will work in about the same way as Etcher: Choose the "Anyboot" image as source, pick the correct USB flash drive, write the image.
Haiku: Using Installer and DriveSetup
Under Haiku you can use DriveSetup and Installer to prepare a USB flash drive. The big advantage is that it will be able to use all the space available on the drive, if you choose so.
If you prefer to just write the "Anyboot" image directly onto a USB flash drive, don't care that you cannot use all the space of the drive, and are undaunted by using the potentially destructive tool dd on the commandline, see the "Using 'dd' in Terminal" section below.
After you've downloaded the "Anyboot" disk archive from the Haiku website and unpacked it, you'll have to mount the image. If you chose a "RAW" image, this is done with a simple double-click. For the "Anyboot" image you need to enter this in Terminal (adjust the the/path/to/your/unpacked/haiku-anyboot.iso accordingly, of course):
diskimage register the/path/to/your/unpacked/haiku-anyboot.iso
Now you can mount the image like any other disk, e.g. from Deskbar's menu.
Run DriveSetup (found under in the Deskbar):
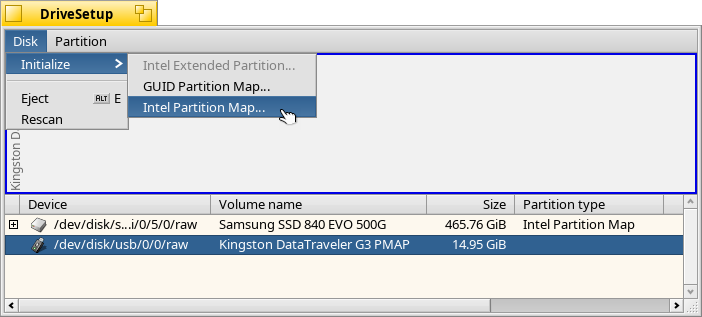
Select the whole USB flash drive (ending with /raw), double check this is the correct drive, and click the menu:
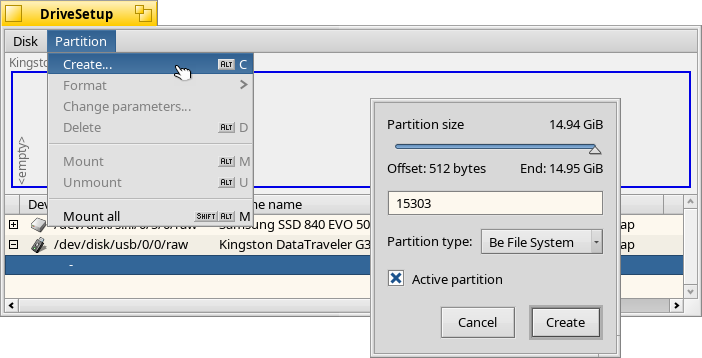
Now click to create a BFS partition. Choose the size you'd like to use for the Haiku boot partition and activate the Active partition checkbox. (You might need to unmount and delete previous partitions if they are of the wrong type).
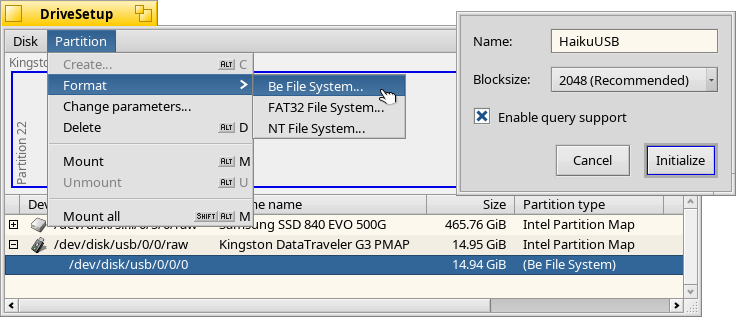
The last step is to go to , choose a name and format the new partition.
Close DriveSetup and launch Installer (found under in the Deskbar).
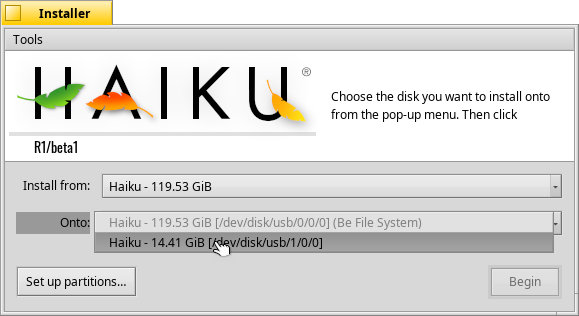
Select the mounted image from the menu and your newly created partition from the destination menu. Click on to start the copying and when that has finished, enjoy your bootable Haiku USB stick.
Using 'dd' in Terminal
Open a Terminal and find the device name of your USB flash drive:
ls /dev/disk/usb
This will list the device name of the USB disks present on your system. You can guess the name by executing this command before and after plugging in your USB flash drive.
The device name looks like this: /dev/disk/usb/[x]/0/raw where x is the disk number ("/0/raw" represents the entire disk and not a partition on it).
Make sure the USB flash drive is not mounted using e.g. Deskbar's menu, and then issue the following command.
dd if=the/path/to/your/unpacked/haiku-anyboot.iso of=/dev/disk/usb/[x]/0/raw bs=1M
Where /dev/disk/usb/[x]/0/raw is your USB flash drive, as determined before.