| Index |
|
Joining a wireless network Joining from the command line Getting supported hardware to work |
Seminar: Rețelistică Wireless
Getting the networking to run is essential in today's need for permanent internet connection. As keeping up to date with all the different and ever changing hardware and drivers is quite impossible for a small project, Haiku relies on a compatibility layer to make use of FreeBSD and some OpenBSD networking drivers. This ensures a massive amount of supported hardware, though probably not 100% of what's out there.
 Conectarea la o rețea wireless
You can use the Desktop applet NetworkStatus to connect to a specific network.
Right-click on its icon in the Deskbar and choose the network's public name (which is the "SSID" it broadcasts) from the context menu.
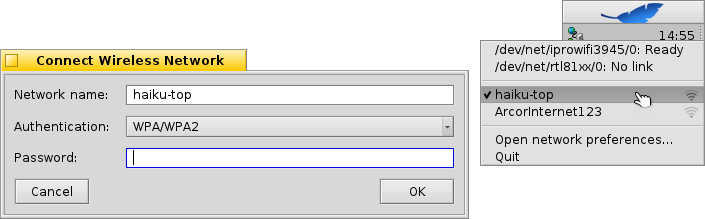
A window opens where you enter the type of authentication (probably WPA/WPA2, WEP is not a secure encryption anymore!) and the password for that wireless network. Tick the checkbox below to so you don't have to enter all the information again next time you connect to this network.
Click to start the login process.
Depending on your hardware and network configuration this may take a while. You'll be kept informed of the progress by notifications:
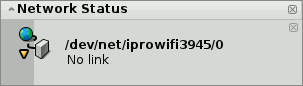
Once it reads "Ready" and the NetworkStatus icon in the Deskbar shows a green round light, the connection is established. If the notifications end in "No link" and a yellow triangle, something went wrong, probably an incorrect password.
Conectarea din linie de comandă
Dacă preferați să utilizați linia de comandă sau doriți să folosiți scriptare sau ~/config/settings/boot/UserBootscript pentru a automatiza pașii de alăturare unei rețele specifice la pornire, există comanda ifconfig.
Deschideți un Terminal și introduceți prima linie care scanează pentru rețele wireless disponibile:
ifconfig /dev/net/iprowifi3945/0 scan
name                             address              signal  auth
haiku-top                        01:d0:19:a6:88:42        30  WPA
ArcorInternet123                 00:20:12:a4:29:e1        15  WPA
Desigur, calea către adaptorul de rețea wireless trebuie să fie ajustată.
Rezultatul arată numele public (SSID), adresa MAC, puterea semnalului și metoda de autentificare pentru toate rețelele găsite.
Pentru a vă alătura unei rețele, utilizați această linie și introduceți respectivul nume public (SSID) și parolă:
ifconfig /dev/net/iprowifi3945/0 join {SSID} {password}
Make sure the initial configuration of the wireless network adapter after booting up has finished, before issuing ifconfig commands or they might be ignored. Depending on your hardware and network configuration that may take a while. Watch those notifications…
Rezolvarea problemelor cu hardware compatibil
All supported modern wireless hardware works out of the box and you don't have to download/install any additional firmware.
Only a few quite old chipsets (Intel 2100/2200/2225/2915, Broadcom 43xx, Marvell 88w8335) require binary firmware modules that Haiku cannot include due to licensing issues, though. To get these wireless cards to work, a simple script is included which will retrieve and install all of the needed proprietary bits for you.
Deschideți un Terminal și scrieți:
install-wifi-firmwares.sh
Revizuiți licențele și acceptați-le pentru a instala toate fișierele firmware disponibile acum.
If you cannot obtain the binary firmware files via the install-wifi-firmwares.sh script (for example due to lack of internet connection within Haiku), you can also download this shell script, and run it from another OS that has wget and zip installed.
Windows users need to have wget and zip for Windows installed in their default locations and use this batch script.
The script will download the needed files and create a zip file that is to be extracted to Haiku's /boot. Once unpacked, open a Terminal and type:
install-wifi-firmwares.sh
Revizuiți licențele și acceptați-le pentru a instala toate fișierele firmware disponibile acum.