Haiku-specific commandline applications
| Per la Spurilo: | /boot/system/bin/ /boot/system/non-packaged/bin/ ~/config/bin/ ~/config/non-packaged/bin/ |
All commandline applications shipped with Haiku are in /boot/system/bin/. Your own or additionally installed commandline apps will appear there as well, or in ~/config/bin/, when installed from a .hpkg package. Otherwise you can put them into /boot/system/non-packaged/bin/ or ~/config/non-packaged/bin/. All these locations are part of the PATH variable and are therefore automatically found.
The following isn't an exhaustive list of all Haiku-specific CLI apps, it serves just to highlight a few of the most useful to give you a taste. Feel encouraged to explore what's in the bin/ folders on your own a bit. Executing an app with the parameter --help shows the usage of the command and all its various options.
 Relating to attributes: listattr, catattr, addattr, rmattr, copyattr
These commands are used to display, read out, add and remove attributes of files. Remember that these meta data are currently only available on BFS formatted volumes. Moving files onto other file systems will strip all attributes!
All these commands are described in topic Attributes in Terminal.
Relating to the index: lsindex, mkindex, reindex, rmindex
With these commands you list, make, reindex and remove attributes to BFS' index. Every volume has its own index, remember that when copying files from one volume to another.
These commands are described in topic Index.
Relating to package management: package, pkgman
The package command is used to manage HPKG packages. Have a look at the article Installing applications to learn the very basics. Usually the tool haikuporter is used to automatically create packages from so-called recipes.
pkgman is used to search, install, update and uninstall packages. Package repositories can be added, dropped and their package lists refreshed. A special kind of update is invoked with the parameter full-sync: it is more aggressive and also downgrades or removes packages, if necessary.
For more details on a parameter, append "--help", e.g. pkgman search --help
Useful scripting commands
Here are a few commandline tools that are especially useful for scripting (see also topic Bash and Scripting).
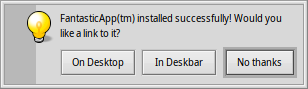
alert | alert conjures up the typical alert window with a pre-defined icon, explanatory text and up to three buttons. It will return the title of the pressed button and an exit status (starting with 0). For example, this is made of the line: alert --idea "FantasticApp(tm) installed successfully! \ Would you like a link to it?" "On Desktop" "In Deskbar" "No thanks"
| |
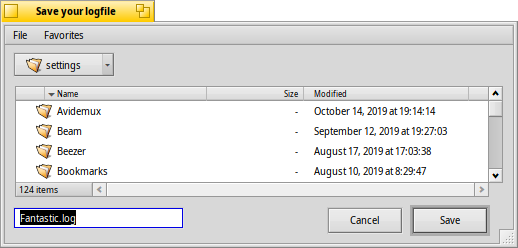
filepanel | filepanel displays a load or save file panel and lets the user choose a file or location. As a return value you'll get the chosen file or folder's path. There are several parameters available, for example to set a starting directory, a window title, a default name when saving or restrictions to the allowed types of files. This is an example of filepanel -s -t "Save your logfile" -d ~/config/settings -n Fantastic.log
| |
hey | hey is a littler helper tool that sends BMessages to applications and prints out their answer. It can be used for application scripting, i.e. "remote controlling" a program from a script or the command line. Its usage is a bit complex… Humdinger's blog post serves as a good introduction, and thanks to Scot Hacker's BeOS Bible, there is a much more comprehensive hey tutorial by Chris Herborth. | |
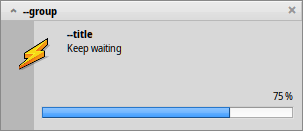
notify | notify shows a notification panel with a message. There are various parameters that are described when you call notify --help. A notification can also be used to show the progress of some action. When doing that, it's important to set a messageID and always use it when you update the progress (a float between 0.0 and 1.0 that's printed as percent). Otherwise you'll see several notification panels if you update quicker then the set timeout. notify --type progress --group "--group" --title "--title" --icon /boot/home/bebook.hvif \ --messageID MyMessageID --progress .75 "Keep waiting"
| |
query | query is the commandline version of the Find panel. In fact, a quick way to generate the search term is to build a query in the Find panel, switch to , add double quotes (") in front and back and paste the whole string after your query command in Terminal or your script. | |
waitfor | waitfor is a nice way to wait for a particular application or thread to be started or to have ended. |
Other commands
checkfs | checkfs is an important tool to check for errors in your file system. Simply add a volume name like /Haiku or device path and it'll run through every file and correct inconsistencies where possible. | |
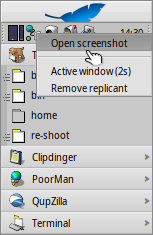
desklink | desklink can install an icon for any file, folder, query or application in the Deskbar tray. It also offers the option to provide a context menu when right-clicking an icon to execute special actions. As an example, try this to add the commandline app screenshot with various options (the "\" in the first line is just for the line break in Terminal): desklink "cmd=Active window (2s):/bin/screenshot --window --border --delay 2" \ "cmd=Remove replicant:desklink --remove=screenshot" /bin/screenshot
| |
diskimage | diskimage lets you register a regular file as disk device. For example, you can register a Haiku anyboot image, mount it in Tracker and copy, edit or remove files there before using it as source in the Installer. | |
launch_roster | The launch_daemon starts all sorts of services and applications at boot-up. For some it was instructed to re-start them if they were quit. If you don't want that – maybe you'd like to test a modified Tracker, for example – you use launch_roster to stop the re-starting of the application before quitting it. Similarly, you can start it again or get info about it. The parameter log prints out a log of all launch_daemon related events. launch_roster stop x-vnd.be-tskb | |
mountvolume | mountvolume is preferred by many to mount local partitions and disks, because its usage is so easy: just call it with the name of the partition and you're done. Try --help for more options. mount can additionally mount remote disks by using a network filesystem, like NFS4. You specify the used filesystem with the -t parameter and the remote location with the -p parameter. As filesystem parameter you can use anything you find in /system/add-ons/kernel/file_system (and corresponding file hierarchies under ~/config or "non-packaged", of course). You also have to create a folder as mountpoint. Here's an example: mkdir -p /DiskStation mount -t nfs4 -p "192.168.178.3:volume1" /DiskStation | |
open | open is a very handy little tool. With it you open any file with its preferred application, or start a specific application by its signature without the need to know its exact path. It also works with URLs and even with the "virtual" directories . for the current directory and .. for the parent, opening the folder in Tracker. | |
ramdisk | A ramdisk is like a harddisk running only in the computer's memory. That makes it very fast but also volatile, because its contents vanishes when you shut down the computer, or it crashes or you experience a blackout. ramdisk create -s 1gb mkfs -q -t bfs /dev/disk/virtual/ram/0/raw RAMses mountvolume RAMses Note: When creating a ramdisk, the ramdisk command prints out the path to it. If you create several disks, that path /dev/disk/virtual/ram/0/raw will change! To preserve the contents, at least if no calamity like a blackout etc. strikes, a ramdisk can be set up to read/write an image on the harddisk. For that, you need to supply a file of the desired size that will be read from every time you start your ramdisk, and written to when you unmount it. To create an image file "RAMimage" of 500MiB and format it, do this: dd if=/dev/zero of=RAMimage bs=500M count=1 mkfs -q -t bfs /dev/disk/virtual/ram/0/raw RAMimage From now on, you start the ramdisk like this: ramdisk create RAMimage mountvolume RAMimage It's very important to always cleanly unmount you ramdisk, either from Tracker or with unmount /RAMimage, or the changes won't be written back to the image file! | |
screenmode | This command sets the screen mode (resolution, bit depth, refresh rate). Normally, you'd set that in the Screen preferences. Another parameter makes it useful in combination with the Shortcuts preferences: e.g. --brightness +3 increases the brightness by "3". Useful to change the backlight with a key combination. | |
setvolume | This command sets the volume of the system master output. Besides specific values in dB, you can --togglemute, --mute or --unmute and --increase or --decrease the volume. Useful to assign key combinations with the Shortcuts preferences. |