 Appearance
| Per la Laborstrio: | ||
| Per la Spurilo: | /boot/system/preferences/Appearance | |
| Dosieroj de agordo: | ~/config/settings/system/app_server/appearance ~/config/settings/system/app_server/fonts |
The Appearance preferences lets you change some aspects of Haiku's visuals.
 Fonts
Fonts

Haiku defines three standard fonts for different purposes. You set plain, bold and fixed font types and sizes that will be used throughout the system. Besides these, there's also a separate setting for the font used in menus.
Installing new fonts
New fonts that don't come as part of a regular .hpkg package, can be installed by copying them into a subfolder according to the font type (otfonts, psfonts or ttfonts) into their respective non-packaged folder (see topic Filesystem layout). For TrueType fonts that would be:
| /boot/system/non-packaged/data/fonts/ttfonts/ | for fonts available to every user. | |
| /boot/home/config/non-packaged/data/fonts/ttfonts/ | for fonts only available to yourself. |
Colors
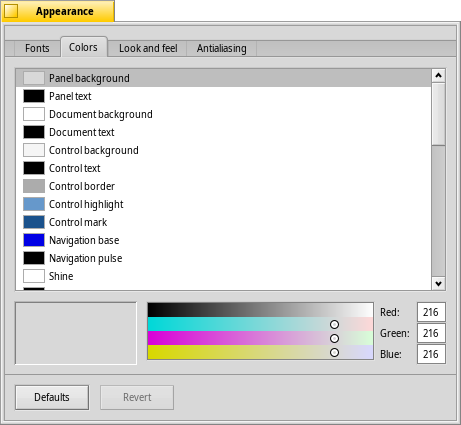
In the tab, you can change the colors of different parts of the user interface. The color well accepts drag & drops from other programs, letting you drag colors over from e.g. WonderBrush, Icon-O-Matic or the Backgrounds panel.
If you activate the checkmark to , the list of user interface colors gets reduced to:
| default: gray | ||
| default: blue, used e.g. to outline the active widget like a button or list | ||
| default: the iconic yellow window tab |
With this setting all the other colors are set automatically. For example, the text color becomes white if you choose a dark panel color.
You can also choose those three primary colors first and have the system set the secondary colors accordingly, then remove the checkmark and fine-tune individual colors.
Window decorators
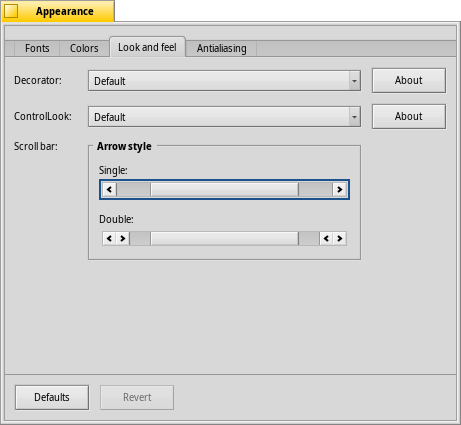
Decorators determine the look and feel of windows and all GUI elements. Currently Haiku comes with only one default decorator. Should you find and install other decorators, you can choose a different one from the pop-up menu.
Haiku's default decorator lets you set the arrow style of the scroll bar: either single arrows at the end of scrollbars to conserve a bit of space, or double arrows — the traditional BeOS way — potentially saving some mouse moving when scrolling up and down or left and right…
Antialiasing
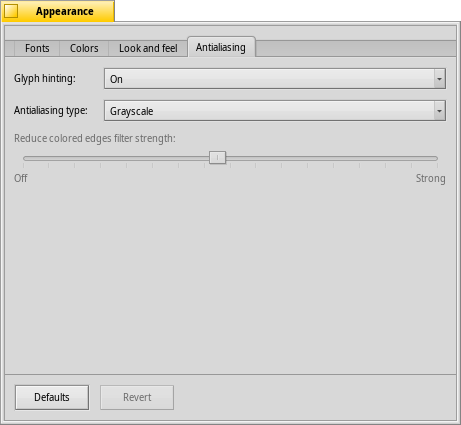
The tab provides different settings for how things are rendered on screen.
Glyph hinting
An activated aligns all letters in such a way that their vertical and horizontal edges rest exactly between two pixels. The result is a perfect contrast, especially when dealing with black on white. Text appears crisper. There's also a setting for that's especially helpful with low resolution devices like netbooks. Small fonts can look pretty bad when hinting is turned on, but with this setting you still have the advantage of hinting for text editors and Terminal.
See the difference hinting makes with these magnified screenshots:
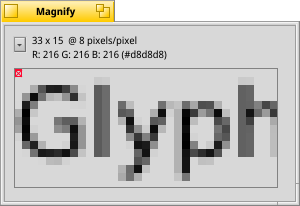 Hinting: off | 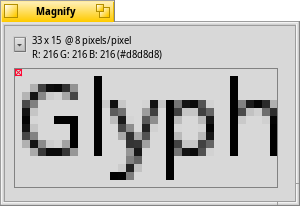 Hinting: on |
It should be pointed out that all the Magnify windows on this page are of course rendered themselves with the different options as well. So, you get a real world impression of the settings by comparing, for example, the bold yellow tab title or the text "33 x 15 @ 8 pixels/pixel".
Antialiasing type
Another technique to improve rendering is Antialiasing, which supports all vector graphics as well as text. It smooths lines by changing the color of certain pixels. There are two methods for that:
changes the intensity of pixels at the edge.
does an even better job, especially with (high resolution) LCD monitors. Instead of the intensity of a pixel, it changes its color which moves an edge by a fraction of a pixel, because LCD displays produce every pixel with a red, green and blue component.
Again, the two different methods with magnified screenshots:
Grayscale, Hinting: off | LCD subpixel, Hinting: off |
Subpixel based antialiasing adds a slight colored shine to objects. Something not everyone tolerates. In Haiku you can mix the two antialiasing methods and find the right setting for you by using a slider.
This is how hinting with compares to Grayscale:
Grayscale, Hinting: on | LCD subpixel, Hinting: on |
At the bottom of the panel are two buttons:
| resets everything to default values. | ||
| brings back the settings that were active when you started the Appearance preferences. |